 Free & Easy Returns
 Best Deals

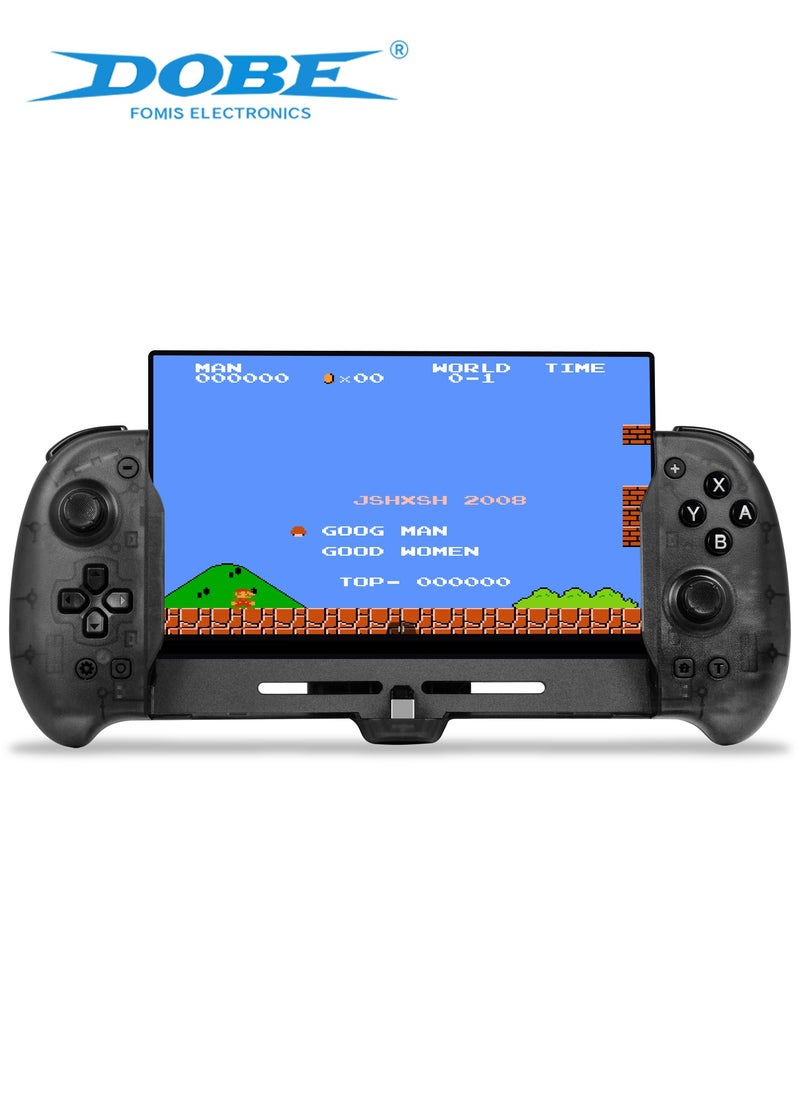


Notice: Switch OLED console not included – controller only.
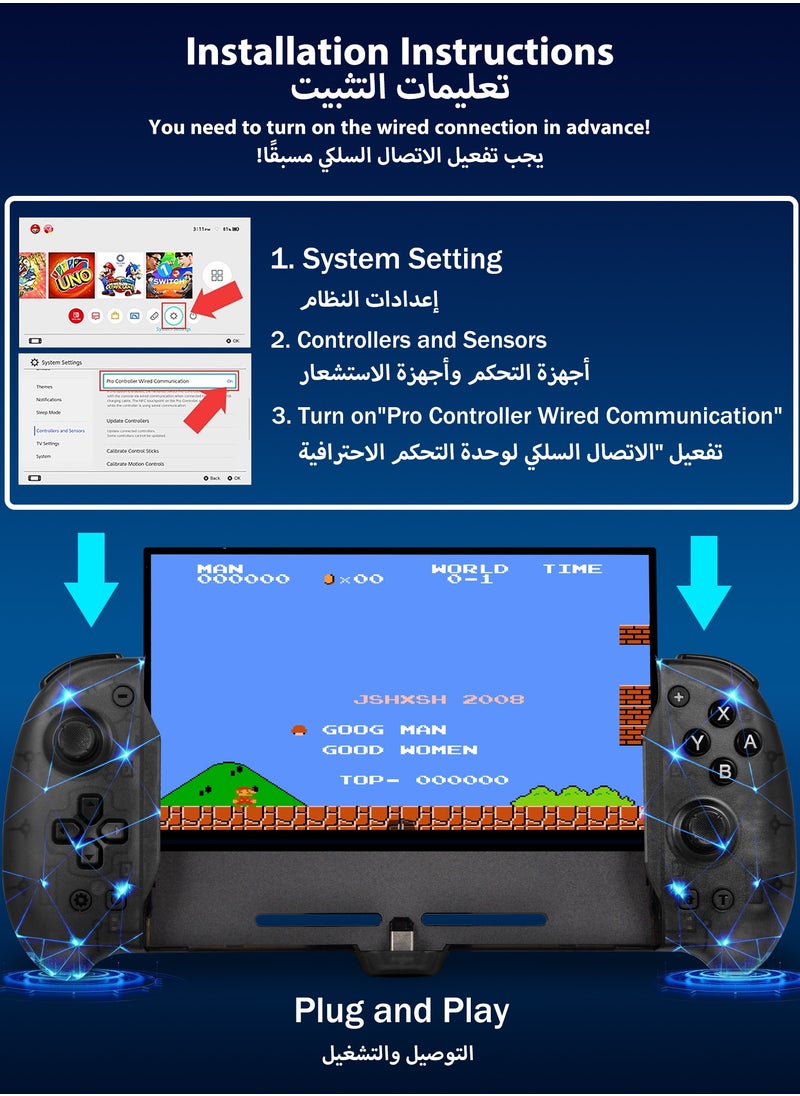
🎮Plug and Play ▶ Simply detach the Joy-Con controllers and slide the Switch console into the controller. The connection is established automatically via the USB-C connector. Calibrate the control sticks and motion sensors to eliminate drift for precise gameplay.
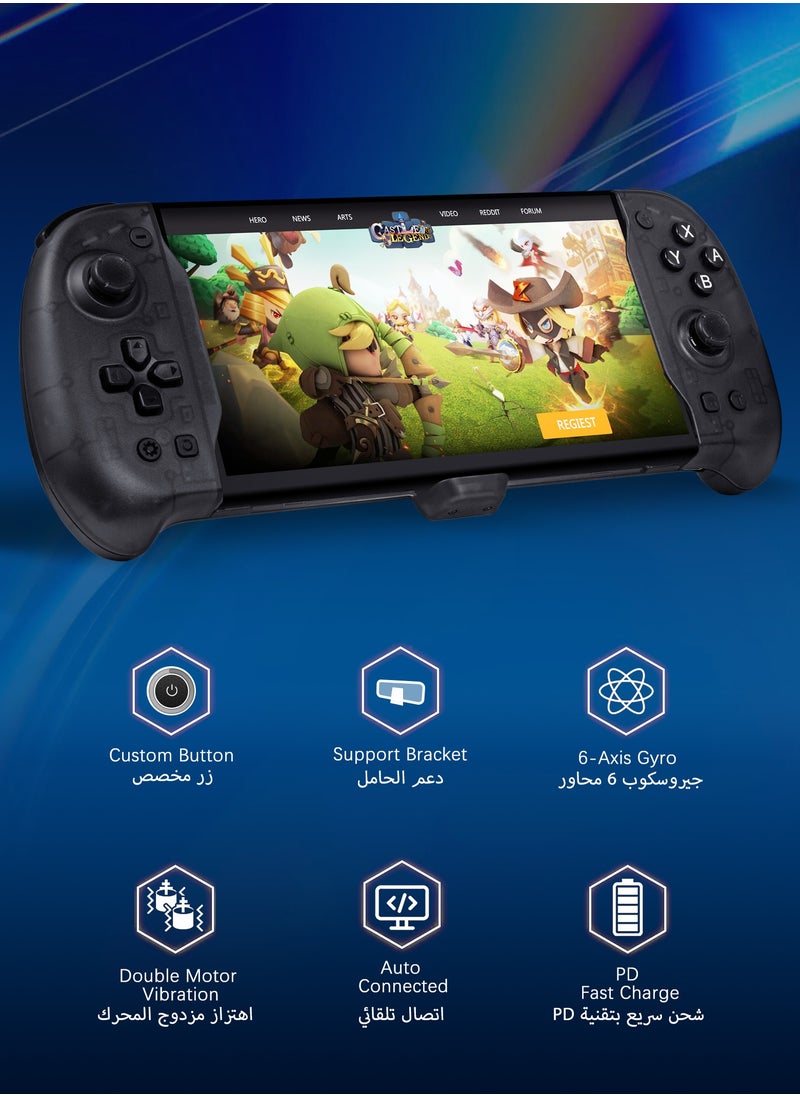
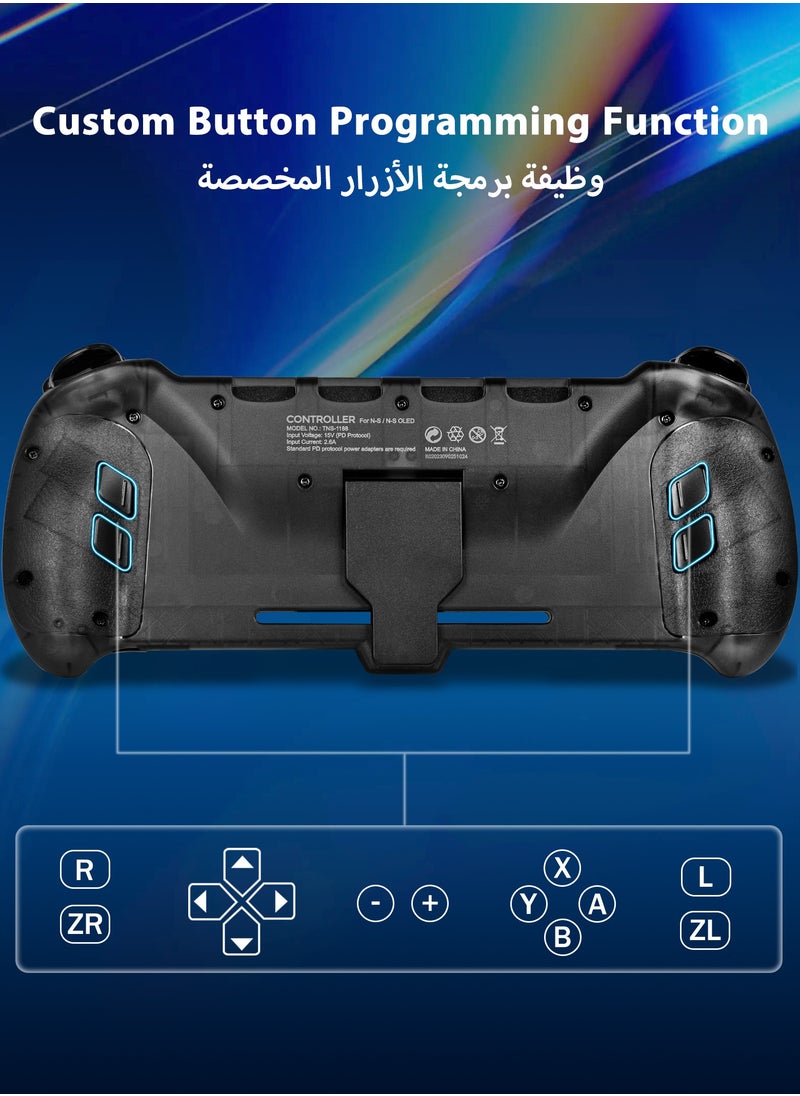
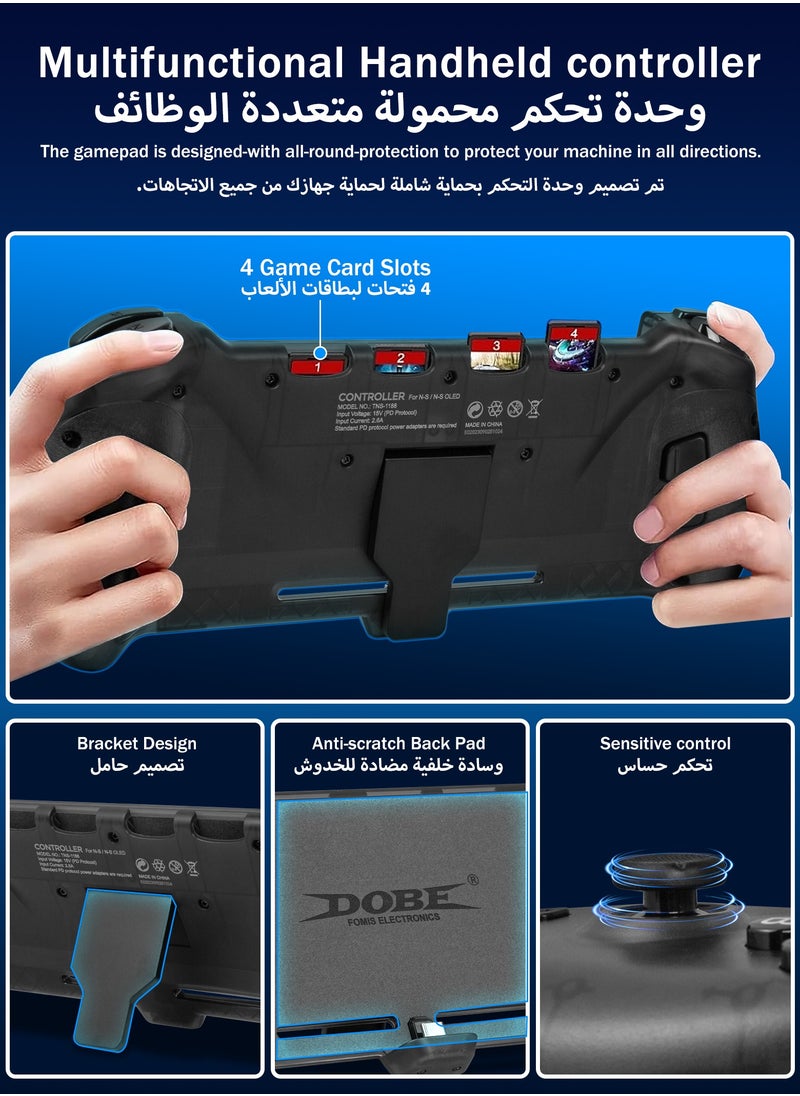
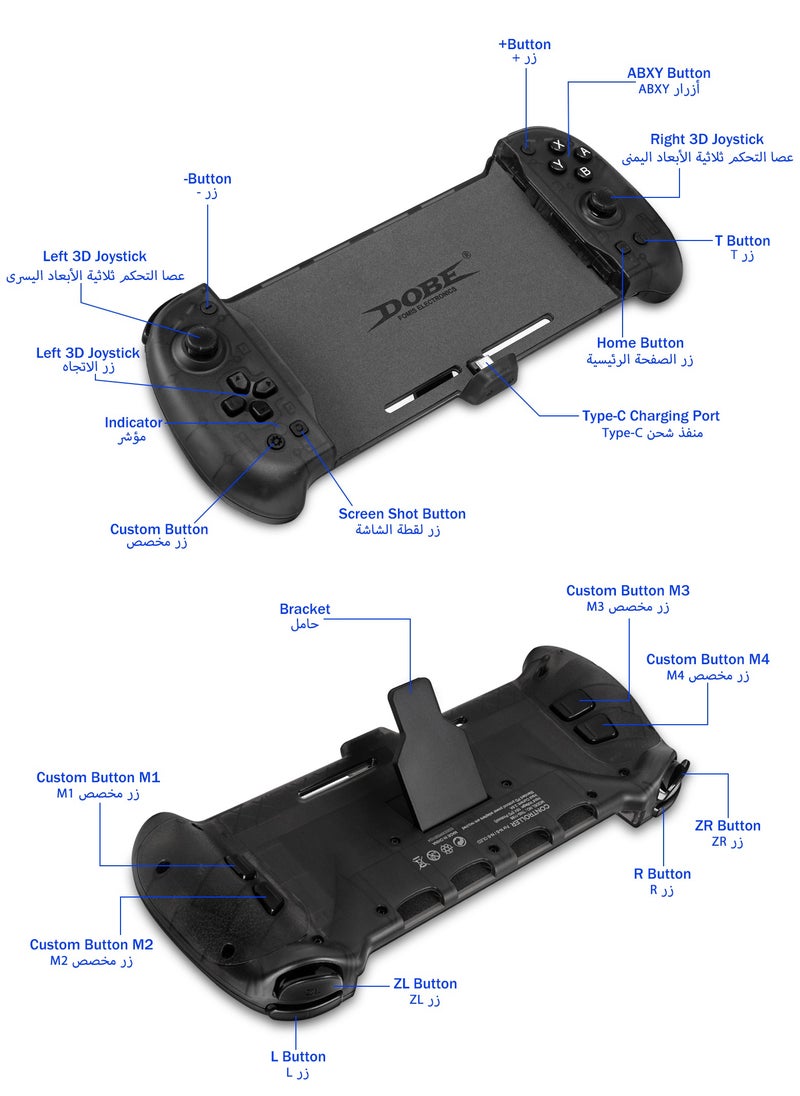
🕹️Customizable Back Buttons ▶ Add up to 16 key combinations with four mappable back buttons. Supports mapping for A, B, X, Y, +, -, L, R, ZL, ZR, D-pad, L3, R3, and also includes TURBO and screenshot functions.
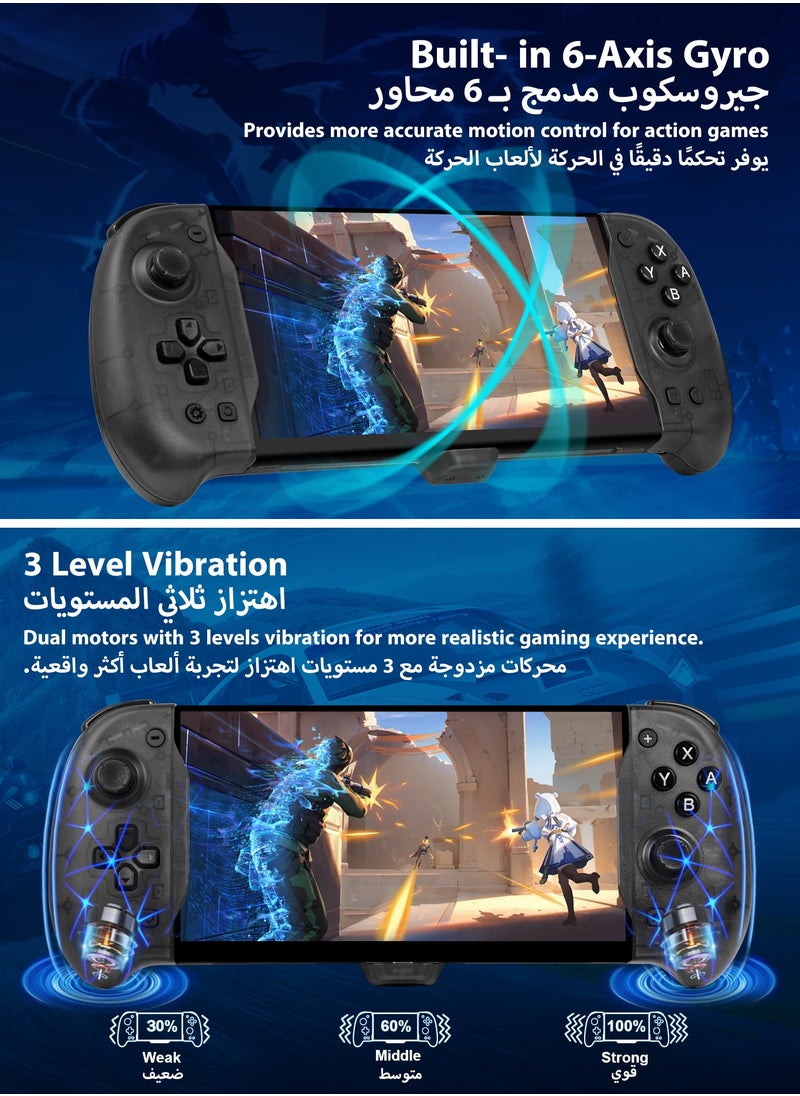
🎮Gyro Sensor & Dual Vibration ▶ Equipped with a built-in 6-axis motion sensor and dual motors, ensuring accurate aiming and immersive vibration feedback. Dual analog joysticks and a responsive left D-pad offer smooth movement and enhanced control.
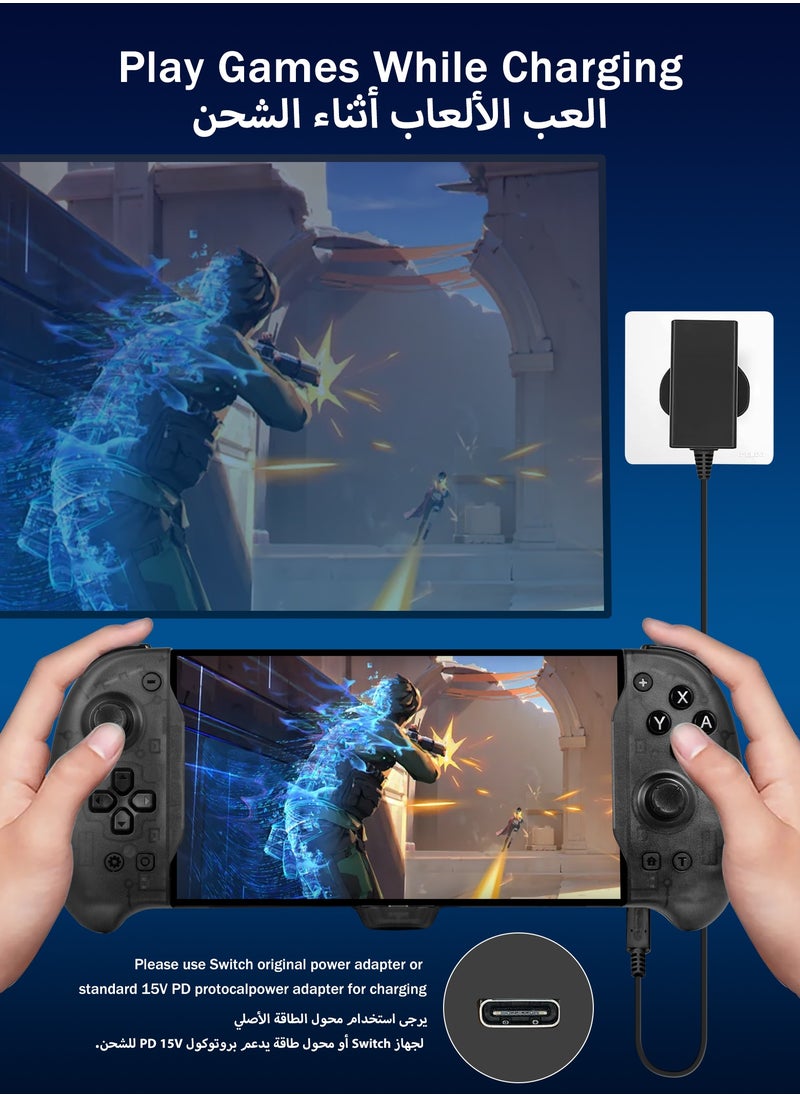
🕹️Play & Charge ▶ Powered by your Switch console. Features a USB-C port that charges your console while you play. For recharging, use the original power adapter or a standard 15V PD protocol power adapter (adapter not included)
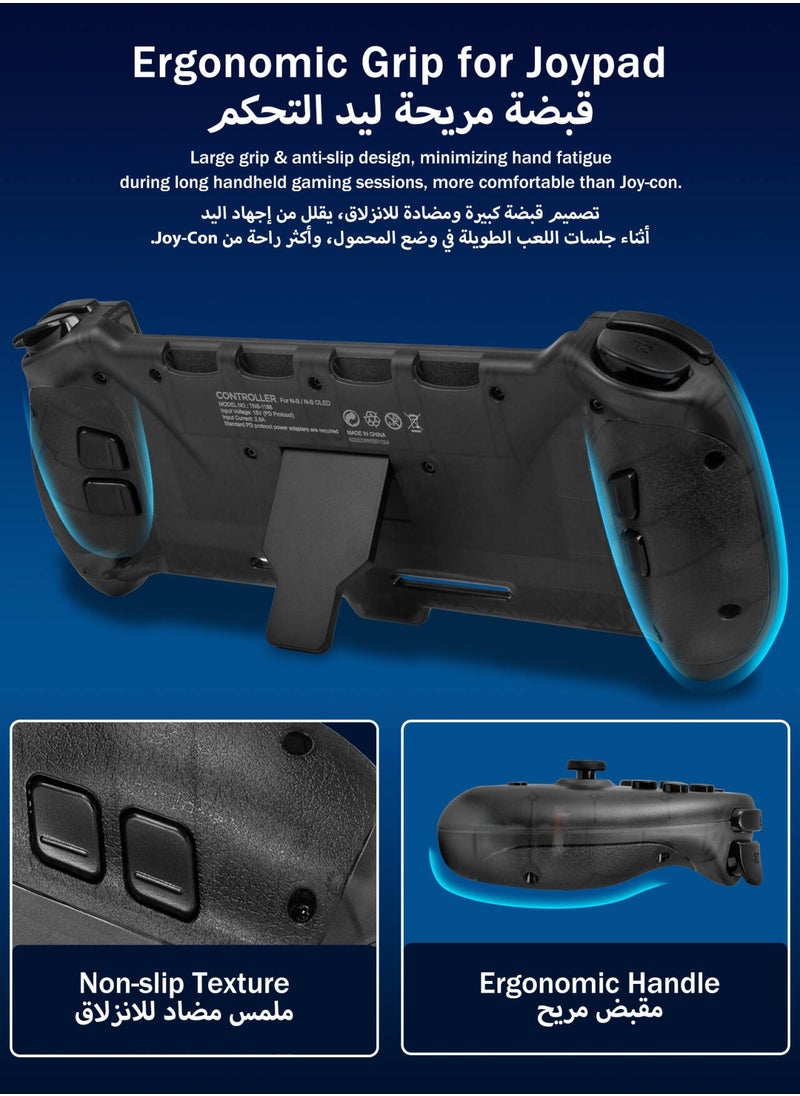
🎮Ergonomic Design ▶ Crafted with an ergonomic, skid-proof texture for a comfortable and secure grip during extended gameplay. Includes four game card slots to store your favorite games, plus a built-in kickstand for convenient hands-free play.
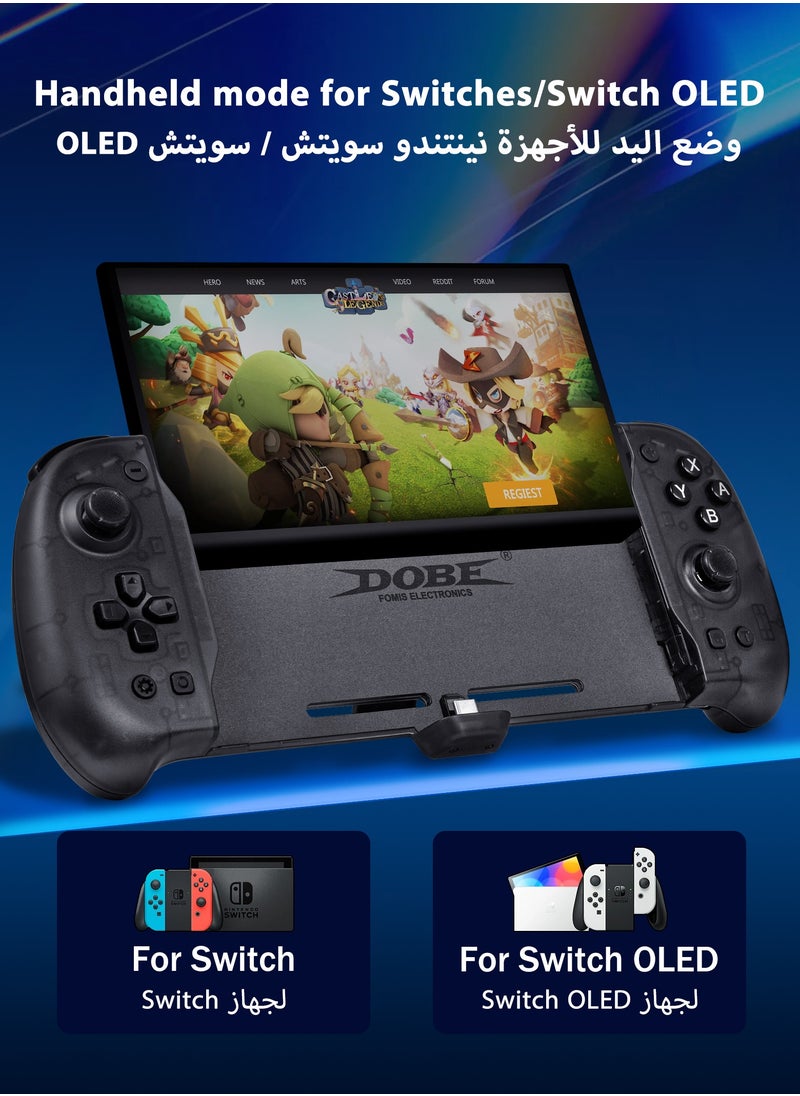
🕹️Wide Compatibility ▶ Fully compatible with Nintendo Switch and Switch OLED models (not compatible with Switch Lite).
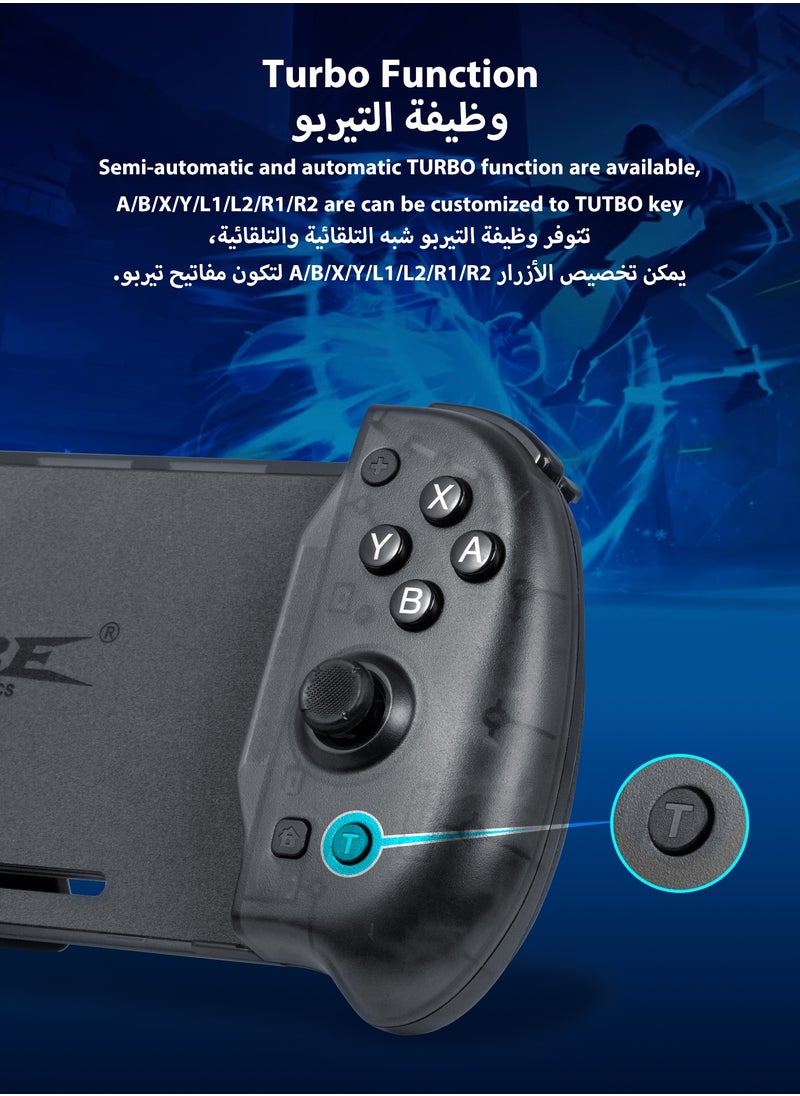
Turbo function (set of rapid fire) :
1. Semi-automatic TURBO function Settings ▶ hold down any key A, B, X, Y, L1, L2, R1, R2, and then press the Tutbo key to enter the Tutbo function. Hold down any key A, B, X, Y, L1, L2, R1, R2, and press Tutbo twice to clear the semi-automatic TURBO.
2. Automatic TURBO function setting ▶ hold down any key of A, B, X, Y, L1, L2, R1, R2 that has been set, and then press the Tutbo key to enter the Tutbo function. Hold down any key that has been set to half automatic A, B, X, Y, L1, L2, R1, R2, and then press Tutbo to clear the automatic TUTBO function.
3. All Semi-automatic/Fully automatic TURBO functions are cleared ▶ long press the T key for 5 seconds to vibrate the handle, indicating that all the semi-automatic/fully automatic TURBO functions have been cleared. Note: (Press the key with fully automatic TUTBO function can temporarily set the automatic TUTBO function of this key, and restore the automatic TUTBO function after release)
Connection description:
1. Before installation, open the N-S console to enter the Settings menu, find the "Processing and Sensors" setting item, and set "Professional Controller Wired Connection" to "On".
2. After inserting the N-S console into the controller, press the A key of the controller to enter the controller, enter the setting menu, find the setting item of "Handle and sensor", and calibrate "Calibration Joystick" and "Calibrate gyro sensor" before use.
Installation note: Do not touch the 3D joystick (or other buttons) when inserting the N-S console to prevent deviation when the 3D joystick is automatically calibrated after starting up. If there is any deviation from the 3D joystick, unplug the N-S console and reconnect it, or calibrate it through the "CalibrateJoysstick" item in the N-S console Settings menu
Custom button programming features:
1. Custom button setting ▶ (When the programming function is not set, the light will not be on)
• Press the "ASSIGN" button for 2 seconds, and the white indicator will slowly blink, indicating that you have entered programming mode.
• Press the custom button you want to set, and a white light will flash quickly, indicating that the function button you want to set is selected.
• Press the custom button set on the back again, and the white indicator light will normally light up, indicating that the button has been successfully set.
(Custom buttons: M1, M2, M3, M4 have the same setting method)
2. Buttons that can be set with custom functions ▶ A button, B button, X button, Y button, + button, - button, L button, R button, ZL button, ZR button, "cross" button (up, down, left, right), L3 button (left 3D joystick press button), R3 button (right 3D joystick press button).
3. Press the ASSIGN button and the corresponding button (M1/M2/M3/M4) to clear the function of a single custom button. When the corresponding button is pressed, the LED light of the screen capture button will light up normally, and the light will be extinguished briefly after clearing.
(Custom buttons: M1, M2, M3 and M4 have the same cleaning method)
4. Clear all functions of the custom button ▶ Hold down the "ASSIGN" button for 5 seconds, and the white indicator will be off, indicating that all functions of the custom button have been cleared.
NOTE:
- It's a wired controller with no Bluetooth and NFC function. Please always set "Setting > Controller and Sensor > Pro Controller Wired Communication" to "ON" and turn off the controller upgrade switch.
| Product Weight | 390 g |
| Version | International Version |
| Colour Name | TNS-1188 |
| Connection Type | Wired |
| Product Length | 29.4 cm |
| Product Height | 5 cm |
| Product Width | 13.2 cm |
| Type of Console Software | Nintendo Switch |
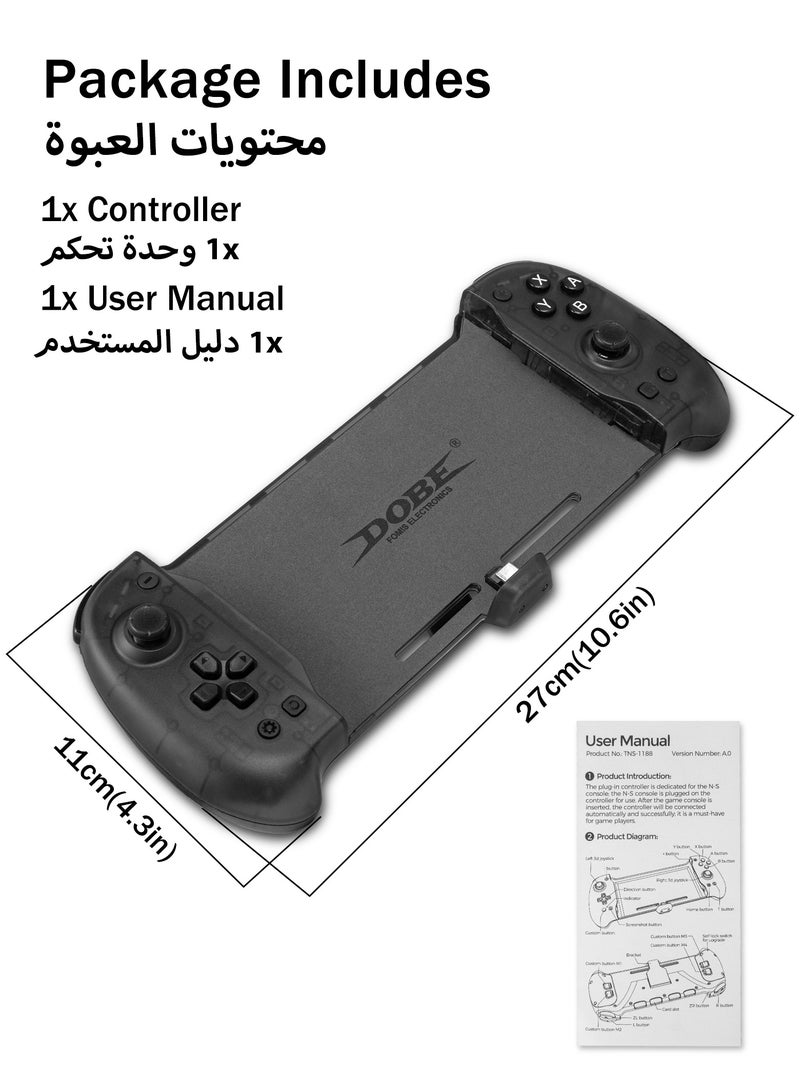
| What's In The Box | 1 x Handheld Controller; 1 x User Manual |
| Model Number | TNS-1188 |
| Model Name | TNS-1188 |


![/fashion-men/jack_jones/?sort[by]=popularity&sort[dir]=desc&limit=50](https://a.nooncdn.com/cms/pages/20240305/4ef48af441e2b44cea1673cd2e4aff67/en_dk-men-brands-04.png)


![/fashion-men/seventy_five/?sort[by]=popularity&sort[dir]=desc&limit=50](https://a.nooncdn.com/cms/pages/20240305/4ef48af441e2b44cea1673cd2e4aff67/en_dk-womens-new-brands-01.png)
![/fashion-men/skechers/?sort[by]=popularity&sort[dir]=desc&limit=50](https://a.nooncdn.com/cms/pages/20240305/4ef48af441e2b44cea1673cd2e4aff67/en_dk-womens-new-brands-02.png)


![/fashion-women/mango/?sort[by]=popularity&sort[dir]=desc&limit=50](https://a.nooncdn.com/cms/pages/20240305/4ef48af441e2b44cea1673cd2e4aff67/en_dk-women-brands-05.png)
![/fashion-women/guess/?sort[by]=popularity&sort[dir]=desc&limit=50](https://a.nooncdn.com/cms/pages/20240305/4ef48af441e2b44cea1673cd2e4aff67/en_dk-women-brands-09.png)


![/fashion-women/ella/?sort[by]=popularity&sort[dir]=desc&limit=50](https://a.nooncdn.com/cms/pages/20241812/en_dk-nav-brands-01.png)
![/fashion-women/skechers/?sort[by]=popularity&sort[dir]=desc&limit=50](https://a.nooncdn.com/cms/pages/20241812/en_dk-nav-brands-02.png)


![/fashion/view-all-kids-clothing/nike/?sort[by]=popularity&sort[dir]=desc&limit=50](https://a.nooncdn.com/cms/pages/20240911/nav-web/en_mb_uae_brand-01.png)
![/fashion/view-all-kids-clothing/disney/disney_minnie_mouse/disney_frozen/disney_princess/disney_mickey_mouse/disney_baby/?sort[by]=popularity&sort[dir]=desc&limit=50](https://a.nooncdn.com/cms/pages/20240911/nav-web/en_mb_uae_brand-03.png)


![/fashion/view-all-kids-clothing/new_balance/?sort[by]=popularity&sort[dir]=desc&limit=50](https://a.nooncdn.com/cms/pages/20240911/nav-web/en_mb_uae_brand-11.png)


![/baby-products/momcozy/?f[partner][]=p_9404&sort[by]=popularity&sort[dir]=desc&limit=50&page=1&isCarouselView=false&av=0](https://a.nooncdn.com/cms/pages/20241031/navrev-baby/en_uae_dk-nav-04.png)


![/music-movies-and-tv-shows/musical-instruments-24670/pianos-keyboards-synthesizers/roland/?sort[by]=popularity&sort[dir]=desc&limit=50&page=1&isCarouselView=false](https://f.nooncdn.com/cms/pages/20250407/books-nav/en_uae_dk-nav-brands-05.png)
![/music-movies-and-tv-shows/musical-instruments-24670/pianos-keyboards-synthesizers/mike_music/?sort[by]=popularity&sort[dir]=desc&limit=50&page=1&isCarouselView=false](https://f.nooncdn.com/cms/pages/20250407/books-nav/en_ksa_dk-nav-brands-04.png)


